Home
> urticator.net
Search
About This Site
> Domains
Glue
Stories
Computers
Driving
Games
Humor
Law
> Math
Numbers
Science
Continued Fractions
Game Theory (Section)
Group Theory
Probability
> Miscellaneous
Commutative Diagrams
On Rectangular Tilings
The Euclidean Algorithm
The Twelve-Note Scale
|
> Tesseract Model |
Tesseract Model
Quick! What is this?
It's a cube, right? A two-dimensional person might argue that it's not, that it's just three diamonds located around a center of triangular symmetry, but to us as three-dimensional people it's obviously a cube. We already see three of the six faces, and if we removed them, we'd see the other three behind.
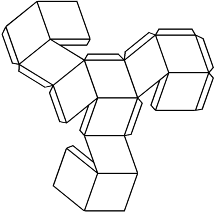
One day, back in college, when I was thinking about four-dimensional objects, I realized that I could project a tesseract into three dimensions in exactly the same way … and that I could make a model of it! Here's a new and improved pattern I made recently.
(I also made a larger version for printing.)
And, here are some instructions, with hints in case you haven't built paper models before.
- Cut out the pattern.
- Crease along the lines before gluing anything. If you want really good alignment, you can score along the lines before creasing.
- Glue the small gaps shut to make four convex three-panel groups. Use as little glue as possible, that way you won't have to wait long for it to dry. You can spread the glue around with your finger to get a nice thin layer.
- Attach the outer groups to the main body … first the right group, then the top left group, then finally the bottom group. For the bottom group you have to glue five tabs at once, which is a bit tricky. Be sure to see how it works before you put the glue on.
The result is a nice little geometric figure, possibly one you've never seen before. From some angles it looks like a hexagon; from others, a square. It has twelve identical diamond-shaped sides, and is officially called a rhombic dodecahedron.
Now, let's go back to the cube for a moment. When we draw a cube as a hexagon, the three visible faces of the cube aren't on the surface of the hexagon, they're in the interior. In just the same way, the four visible faces of the tesseract are in the interior of the dodecahedron. If you want to see them and their tetrahedral symmetry, you can try to visualize them, or you can just build one or more models from the following pattern.
(Here's a larger version with four copies.)
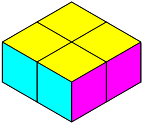
Then, once you have a dodecahedron and some faces, you can play with them! The faces fit together in all kinds of interesting ways. If you color them in (easier to do before assembly), and maybe draw some thicker lines to emphasize the face boundaries on the dodecahedron, you can make things like this, but with an extra dimension.
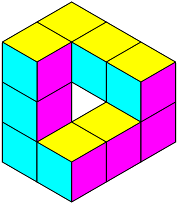
Or things like this!
It's even more fun if you have some units that represent two or more faces stuck together … like polyominoes, or like that Cubits puzzle that was published by Binary Arts. I wasn't inspired to make a complete set, but I did make models for two of the simpler units.
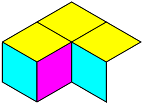
The two-face unit. The construction is a bit tricky, but I'm sure you can figure it out. The main thing to watch out for is that the three panels in the middle don't represent a group, and shouldn't be glued shut. Instead, the loose panel from the end should be inserted there (eventually).The three-face unit that's three quarters of a dodecahedron. Here the bottom group should be concave.
If you want make any others, do let me know … I have some nice PostScript code that I used to lay out all the patterns, and I'd be glad to send it along.
Since the preferred orientation for the models involves having them balance on a point, I also made a pattern for a base unit … essentially, an egg carton for dodecahedral eggs. If you're making one, the idea is that the outer groups should be concave.
Finally, here's a little note about the panel shape. Since the panels fit around a center of tetrahedral symmetry, the larger angle is obviously the tetrahedral angle, which is easy enough to look up or calculate. However, before I realized it was obvious (cf. that one joke), I worked it out using four-dimensional vectors, and I thought the calculation was worth saving. Here's how it went.
Suppose the tesseract has edges of length 1. Choose coordinates so that the origin is at one corner and the axes run along the edges, then the vectors u = (1,0,0,0) and v = (0,1,0,0) are edges, and the vector d = (1,1,1,1) is one of the main diagonals. We want to project into the subspace orthogonal to d … but that's easy enough, we just subtract d/4 from u and v to get w = (3,−1,−1,−1)/4 and x = (−1,3,−1,−1)/4. Those two vectors have length (root 3)/2 and dot product −1/4, so the cosine of the angle between them is w · x / |w| |x| = −1/3. Similarly, in N dimensions, the cosine is −1/(N−1).
Actually, that's obvious too. The N projected vectors sum to zero, and are symmetrical, so if one of them is (1,0,0, … ), the other N−1 must have first component −1/(N−1).
I added the picture of the impossible object at the last minute, as kind of a joke, but then I started wondering what the analogue looked like, and couldn't stop until I'd built one. First I made a complete set of the units above, in color. That worked, sort of—I was able to put together an impossible object, but it used almost all the units, and was so difficult to keep together that I couldn't admire it properly. Fortunately, it still gave me enough perspective to figure out that the analogue of this would make a good building block.
So, next I drew up a pattern for that large unit; then I constructed four of them, stuck them together with Scotch tape, and voilà, I had my impossible object!
The large unit isn't as sturdy as the others, but it works well enough. I guess I should point out that of the nine lines between panels in the same orientation, only the one in the lower right should be folded. Also, that three-panel group should be concave.
Last, and least, when I made the complete set of units, I found that it wasn't necessary to draw thicker lines to emphasize the face boundaries. The units already look great if you just fold them so the printed lines are on the outside.
Since I have a new theory about printers, I went back and resized the six printable images here. I don't think that's a violation of the rule about persistence of content, but it's a gray area, so if you need the old images for anything, just let me know.
See Also
Examples
Printer Theory
@ July (2006)
o September (2006)
o September (2020)


